In this article, you will learn everything you need to know about the DNS Security - Network module. Thanks to their unique combination of local and cloud filtering, we guarantee a minimal system footprint. Now, in an unprecedented move, the Machine Learning (ML) engineers at HEIMDAL Security have successfully built and trained a neural network for DarkLayer Guard - Network (and for the DarkLayer Guard product) that enables the prediction of malicious DNS. Employing an outstanding amount of gradient-boosting decision trees and over 24 DNS features and criteria, the new neural network AI is state-of-the-art. HEIMDAL Security has doubled the rate of correct detections and predicted future domains that are bound to be registered, and unlocked the algorithm’s capacity to detect malicious domains that would have normally escaped detection by the human eye. Combined with the VectorN Detection engine’s power, it will be virtually unstoppable against all malicious attack attempts on enterprise security.
1. Description
2. How does DNS Security - Network work?
3. DNS Security - Network setup guide
4. Heimdal DNS Security Network LogAgent
5. DNS Security - Network view
6. DNS Security - Network settings
DESCRIPTION
HEIMDAL's DNS Security is the world’s most advanced DNS product for identifying infected users and processes. Our cutting-edge Network & Endpoint Prevention, Detection, and Response solutions block attacks before they reach your network, servers, or endpoints. Compatible with any existing Antivirus software, the DNS Security - Network feature is a solution for securing DNS traffic by pre-emptively blocking malicious domains and communications to and from C&C, Phishing, and generally malicious servers.
Heimdal does not share a full repository of the DNS detections due to the tremendous data volume of the AI Predictive DNS; hence, VirusTotal will not necessarily show the Heimdal detection. You will have to rely on the Investigate mode in the Heimdal Dashboard.
HOW DOES DNS Security - Network WORK?
A. Filtering DNS queries through the HEIMDAL DNS Resolvers
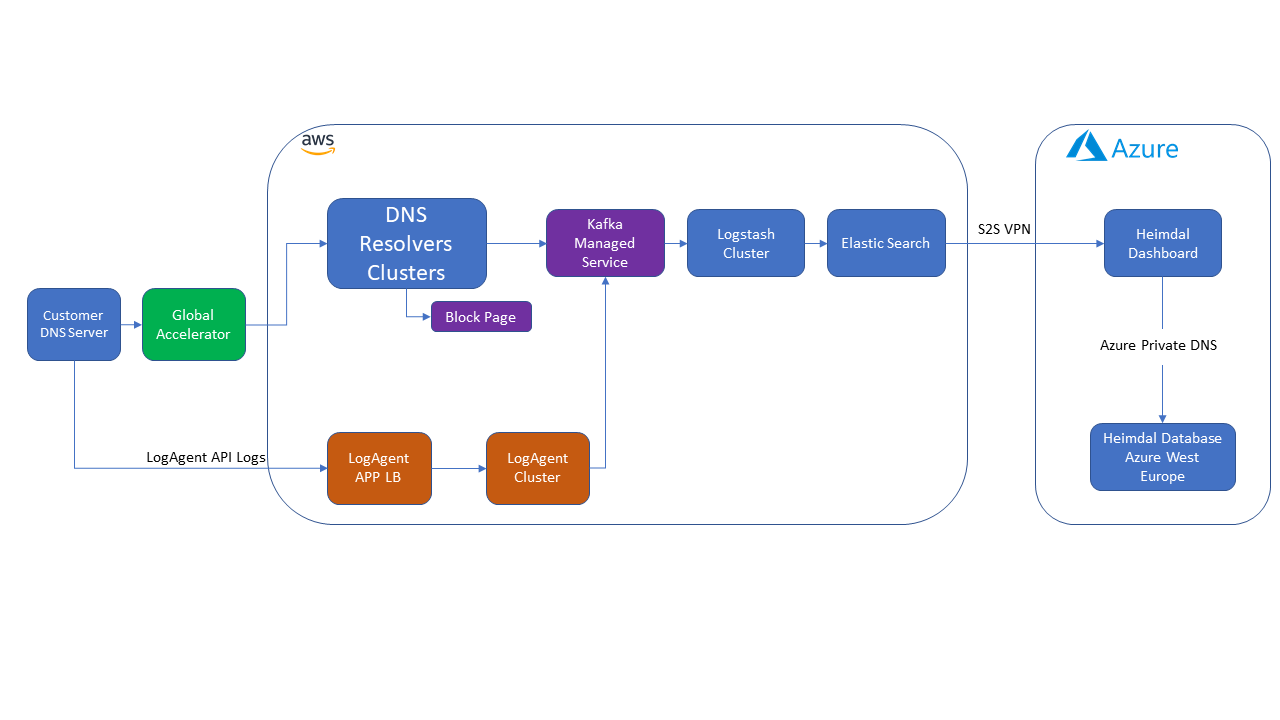
DNS Security - Network is configured on your DNS Server(s) and forwards DNS queries to the HEIMDAL DNS Resolvers, which are responsible for filtering all network packages based on DNS request origin and destination. The engine blocks malicious packages from communicating across the network, prevents man-in-the-browser attacks, detects zero-hour exploits, protects from data or financial exfiltration, and prevents data loss or network infections. A customer's DNS Server is identified by an Access Rule (the Public IP Address of the DNS Server) that will route the DNS queries to the HEIMDAL DNS Resolvers to filter them before being resolved.
B. Filtering DNS queries through Hybrid DNS (running locally on the DNS Server)
This feature will bring the advantage of using a DNS Forwarder of the customer’s choice and, especially, the ability to have a dynamic IP Address on the local DNS resolver, since the Access rules are no longer required. The Hybrid DNS engine creates a local DNS Server that will work as a filtering engine before resolving the DNS Query, through the Heimdal LogAgent that needs to be installed on the DNS Server. Hybrid DNS hijacks the DNS IP Addresses set on the DNS Forwarders to scan for malicious websites and other web locations (servers, online ads, etc) that can potentially install malware or be used as gateways for cyberattacks.
Hybrid DNS will change the DNS (Domain Name System) IP Addresses on the DNS Forwarders to 127.8.8.1 (the Hybrid DNS loopback IP Address). Your initial DNS Forwarder(s) will be backed up in the Windows Registry to be used to solve the DNS Queries after being allowed. Once the DNS IP Address is set, every web location you access via the Internet will be processed through a database that is set locally in the HEIMDAL Agent installation path.
DNS Security - Network setup guide
To set up DNS Security - Network, please follow the steps below:
1. Log in to the HEIMDAL Dashboard.
2. Access the Network Settings section.
3. From the DNS Security tab, make sure the DarkLayer Guard module is turned ON.
4. In the Access Rule section, add your Public IP Address(es) (Name and Subnet required) and press the Update Network Settings button. You can add one or multiple Public IP Addresses with the following subnets: /32, /31, and /30. For wider ranges, please contact the HEIMDAL Security Support Team. Access Rule changes are propagated every 30 minutes. You can add an Access Rule only if you are logged in to the HEIMDAL Dashboard from the Public IP Address that you are trying to add as an Access Rule.
- If you need a wider range, contact the HEIMDAL Security Support Team.
- Once a new Access Rule is added for a Public IP Address or Subnet, it will be allowed in our database. Removing it from the Access Rules will stop the filtering through our DNS Servers and could cause connectivity issues on your DNS Server if you are still forwarding traffic through the DNS Security - Network.
A. DNS Security - Network DNS Forwarders (on Windows Server)
To implement DNS Security - Network in your organization, you will need to configure the DNS Server(s) in your organization to use the following IP Addresses as DNS Forwarders:
- 193.243.129.53
- 76.223.127.10
IMPORTANT
Our DNS Security Network servers are hosted on the AWS infrastructure, and because of AWS' technical limitations, our secondary IP Address (our secondary DNS Forwarder) will NOT resolve to an FQDN (fully qualified domain name), but it will display the Unable to resolve message. Although it's not validating with an FQDN, the DNS Forwarder will point to the right servers and will forward traffic correctly.
To set up DNS Forwarding on your DNS Server, you need to follow the steps below:
1. Open the DNS Manager from the Server Manager. |2. Right-click on the DNS Server and select Properties.
3. Select the Forwarders tab and click the Edit button.
4. Insert the DNS IP Addresses (193.243.129.53 and 76.223.127.10) and hit Enter after each IP Address. After entering both IP Addresses, press OK. Please know that HEIMDAL Security Forwarders will validate only if the Public IP Address of the DNS Server has been added as an Access Rule in the HEIMDAL Dashboard (30 minutes before validation).
The DNS Forwarders should look like this:
5. After configuring the DNS Forwarders, you can test if DNS Security - Network is working by accessing the website notblockedbyheimdalsecurity.com. If the text on the site says "Heimdal Security has blocked this page," this means that DNS Security - Network is working properly.
Here is a how-to change the DNS Forwarder on Windows Server:
B. DNS Security - Network DNS Forwarders (on Ubuntu/Debian)
To implement DNS Security - Network in your organization, you will need to configure the DNS Server(s) in your organization to use the following DNS Security - Network IP Addresses as DNS Forwarders:
- 193.243.129.53
- 76.223.127.10
Our DNS Security Network servers are hosted on the AWS infrastructure, and because of AWS' technical limitations, our secondary IP Address (our secondary DNS Forwarder) will NOT resolve to an FQDN (fully qualified domain name), but it will display the Unable to resolve message. Although it's not validating with an FQDN, the DNS Forwarder will point to the right servers and will forward traffic correctly.
I. Setting up DNS Forwarding on Ubuntu 16.xx, 18.xx, 20.xx
To set up DNS Forwarding on your DNS Server, you need to follow the steps below:
1. Open the interfaces file (/etc/network/interfaces) for editing:
sudo nano /etc/network/interfaces
2. Add the following settings (this is optional):
auto eth0
iface eth0 inet static
 address 192.168.1.2 #an IP at your choice
 netmask 255.255.255.0
 gateway 192.168.1.1
 dns-nameservers 193.243.129.53 76.223.127.10
3. Open the resolv.conf file (/etc/resolv.conf) for editing:
sudo nano /etc/resolv.conf
4. Add the following settings:
nameserver 193.243.129.53
nameserver 76.223.127.10
#options edns0
5. Reboot the machine.
6. Update the apt package cache by typing:
sudo apt-get update
7. Install BIND on the DNS Server.
sudo apt-get install bind9 bind9utils bind9-doc
8. Open the named.conf.options file (/etc/bind/named.conf.options) for editing:
sudo nano /etc/bind/named.conf.options
9. Add the following settings:
options {
 directory "/var/cache/bind";

 // If there is a firewall between you and nameservers you want
 // to talk to, you may need to fix the firewall to allow multiple
 // ports to talk. See http://www.kb.cert.org/vuls/id/800113

 // If your ISP provided one or more IP addresses for stable
 // nameservers, you probably want to use them as forwarders.
 // Uncomment the following block, and insert the addresses replacing
 // the all-0's placeholder.

        forwarders {
              193.243.129.53;
              76.223.127.10;
        };
 //========================================================================
 // If BIND logs error messages about the root key being expired,
 // you will need to update your keys. See https://www.isc.org/bind-keys
 //========================================================================
        dnssec-validation no;
        auth-nxdomain no; # conform to RFC1035
        listen-on-v6 { any; };
};
10. Restart bind using the following command line:
sudo systemctl restart bind9
11. In case there's a firewall rule blocking port 53, you can unblock it with the following command line:
sudo ufw allow 53
II. Setting up DNS Forwarding on Ubuntu 22.xx
1. On Ubuntu 22.04 LTS (which uses a Netplan YAML file for its default interface configuration), you need to open the 00-installer-config.yaml file (/etc/netplan/00-installer-config.yaml) for editing:
sudo nano /etc/netplan/00-installer-config.yaml
2. Add the following settings (this is optional):
network:
  ethernets:
    ens160:
      addresses:
      - 192.168.1.2/24
      nameservers:
        addresses:
        - 193.243.129.53
        - 76.223.127.10
        search: []
      routes:
      - to: default
        via: 192.168.1.1
  version: 2
3. After modifying the above Netplan configuration file, generate and apply the new configuration with the following command lines:
sudo netplan generate
sudo netplan apply
4. Use resolvectl status to verify that the correct DNS servers are being used:
resolvectl status
Global
       Protocols: -LLMNR -mDNS -DNSOverTLS DNSSEC=no/unsupported
resolv.conf mode: stub

Link 2 (ens160)
Current Scopes: DNS
     Protocols: +DefaultRoute +LLMNR -mDNS -DNSOverTLS DNSSEC=no/unsupported
   DNS Servers: 193.243.129.53 76.223.127.10
5. Update the apt package cache by typing:
sudo apt-get update
6. Install BIND on the DNS Server.
sudo apt-get install bind9 bind9utils bind9-doc
7. Open the named.conf.options file (/etc/bind/named.conf.options) for editing:
sudo nano /etc/bind/named.conf.options
9. Add the following settings. The Ubuntu 22.04 LTS BIND version defaults to refusing all queries from client IPs that have not been explicitly allowed in /etc/bind/named.conf.options. There are several ways to change this behavior, but the easiest one is to add the option allow-query { any; }; to /etc/bind/named.conf.options. Note that this is not a secure configuration for a public-facing DNS server.:
options {
 directory "/var/cache/bind";

 // If there is a firewall between you and nameservers you want
 // to talk to, you may need to fix the firewall to allow multiple
 // ports to talk. See http://www.kb.cert.org/vuls/id/800113

 // If your ISP provided one or more IP addresses for stable
 // nameservers, you probably want to use them as forwarders.
 // Uncomment the following block, and insert the addresses replacing
 // the all-0's placeholder.

        forwarders {
              193.243.129.53;
              76.223.127.10;
        };
        allow-query { any; };
 //========================================================================
 // If BIND logs error messages about the root key being expired,
 // you will need to update your keys. See https://www.isc.org/bind-keys
 //========================================================================
        dnssec-validation no;
        auth-nxdomain no; # conform to RFC1035
        listen-on-v6 { any; };
};
10. Restart bind using the following command line:
sudo systemctl restart bind9
11. In case there's a firewall rule blocking port 53, you can unblock it with the following command line:
sudo ufw allow 53
After configuring BIND, you can test if DNS Security - Network is working by accessing the website notblockedbyheimdalsecurity.com. If the text on the site says "Heimdal Security has blocked this page," this means that DNS Security - Network is working properly.
If the page below returns, it means that the protection is not working yet.
IMPORTANT
Please note the fact that it can take 30 to 60 minutes after changing your DNS Forwarders until you see the correct blocking page. Your protection is, however, in place immediately after changing forwarders.
HEIMDAL DNS Security Network LogAgent
When filtering the DNS queries through the HEIMDAL DNS Resolvers, the HEIMDAL DNS Security Network LogAgent allows you to associate the IP Addresses of the Allowed Requests and Prevented Attacks with the Hostnames on which the network filtering took place. When filtering the DNS queries through Hybrid DNS, the HEIMDAL DNS Security Network LogAgent collects all the information and reports it to the HEIMDAL Dashboard. The HEIMDAL LogAgent is installed on the DNS Server and helps the HEIMDAL Administrator to see where the malicious behavior started by identifying the private (local) IP Address and the hostname of the endpoint in question.
REQUIREMENTS
1. The HEIMDAL DNS Security Network LogAgent is supported on 32-bit and 64-bit architectures and can be installed on Windows Server 2012/2012 R2, Windows Server 2016, Windows Server 2019, and Ubuntu 18.04 (and above versions for both operating systems).
2. The HEIMDAL DNS Security Network LogAgent requires Npcap OEM, and that is why we recommend you uninstall WinPcap if it is already present on the DNS Server. Npcap will automatically get installed during the HEIMDAL LogAgent install operation. Other applications that interact with the Npcap driver (like Azure Advanced Threat Protection Sensor) might conflict with the HEIMDAL DNS Security Network LogAgent's flow, which could stop responding or stop ingesting data into the HEIMDAL Dashboard.
3. The HEIMDAL LogAgent requires access to our Log Agent API through port 443 on the following IP Addresses: 3.68.42.215 and 3.122.156.8 (logagent-api.heimdalsecurity.com).
The HEIMDAL DNS Security Network LogAgent can be installed using the following methods:
A. Installing it from the HEIMDAL Dashboard
To install the HEIMDAL LogAgent on your DNS Server from the HEIMDAL Dashboard, you need to have the HEIMDAL Agent running on your specific server. If this condition is met, you can log in to the HEIMDAL Dashboard, click on Management -> Device Info, select your DNS Server, and click Install DNS-N LogAgent and Hybrid DNS from the dropdown menu.
This functionality will fire on the next HEIMDAL Agent Group Policy check and will install the HEIMDAL LogAgent on your DNS Server.
B. Installing the stand-alone HEIMDAL LogAgent (on Windows Server)
To install the HEIMDAL LogAgent on your DNS Server, log in to the HEIMDAL Dashboard, go to the Guide section -> Download and install tab, and download the stand-alone HEIMDAL DNS Security Network LogAgent (for Windows). After downloading the HEIMDAL LogAgent, you can install it on your DNS Server and activate it using your HEIMDAL license key. The HEIMDAL LogAgent can be uninstalled from Control Panel -> Programs and Features (together with Npcap OEM).
C. Installing the stand-alone HEIMDAL LogAgent (on Ubuntu)
To install the HEIMDAL LogAgent on your DNS Server, log in to the HEIMDAL Dashboard, go to the Guide section -> Download and install tab, and download the stand-alone HEIMDAL DNS Security Network LogAgent (for Ubuntu). After downloading the LogAgent Script, unzip it and install it by running the command line below in the Terminal:
sudo sh install-ubuntu.sh <replace_with_license_key_here>
To see the HEIMDAL LogAgent's status, you can also run the following command line:
sudo systemctl status heimdal-logagent
The HEIMDAL LogAgent can be uninstalled from the Terminal using the command line below:
sudo sh uninstall-ubuntu.sh
IMPORTANT
The HEIMDAL LogAgent automatically updates when a new version is available.
DNS Security - Network view
The DNS Security - Network view displays all the information collected by the HEIMDAL LogAgent that is running on the DNS Server(s) in your organization. The collected information refers to the DNS queries that went through your DNS Server(s). On the top, you see a statistic regarding the number of Analyzed Traffic Requests, Prevented Attacks, Prevented Attacks %, and the number of Category Blocks.The collected information is placed in the following views: Standard, Threat Type, Latest Threats, and Most Used Domains.
-
Standard
The details displayed in the Standard view table are the following: Hostname (the HEIMDAL Log Agent is required to collect the hostname of the endpoint making the request), IP Address (the HEIMDAL Log Agent is required to collect the local/internal IP Address of the endpoint making the request), Approved Requests, Prevented attacks, and Risk Level (which is calculated according to the following formulas: Low-risk level - the number of prevented attacks is lower than the number of days, Medium-risk level - the number of prevented attacks is equal or higher than the number of days and lower than 1.66 * the number of days, High-risk level - everything else over these two levels). The data in this view updates every hour. The Standard view is a complete overview of the total analyzed requests, prevented attacks, and manually blocked domains as well as a pre-calculated risk level for your device. All entries are identified by hostname and IP address. The calculated risk score is based on the time frame selected in the HEIMDAL Dashboard and offers a great way to visualize and measure the impact of your awareness training and security procedures that you facilitate in your organization, as you can track the changes in your high-risk users' behavior over time.
The Analyzed Requests represent the total DNS requests intercepted by the HEIMDAL Agent (whether they are blocked or allowed). The Prevent Attacks represent the DNS requests that are blocked by the HEIMDAL Agent, while the Manual Blocklists will display domains blocked based on the entries in the group policies' blocklist.
The information on blocked domains can be arranged and filtered based on the other views available from the dropdown: Threat Type, Domain/Hits(blocks), Hostname/Threats, Latest Threats, Forensics and TTPC. -
Category Blocks
This view displays a table with the following details: Hostname, IP Address, Category and Category Blocked Domains. The Category Blocks view presents a consolidated overview of all hits to the preset Category Filters. This view makes it easy to manage chosen Categories, get a visualization of their impact, and identify users with online behavior that does not match the organization. -
Manual Blocklists
This view displays a table with the following details: Hostname, IP Address, Domain and Type. The view will show domains blocked by the Agent, based on the entries set in the blocklist from the group policy. -
Allowlist Requests
The Pending approval view displays a table with the following details: Domain and Reason.
This view shows all access requests to blocked domains awaiting administrator action. Approving the request will allow you to add the domain to the allowlist in both the group policy for the DNS Endpoint module or the Network settings for the DNS Network module.
The History view displays a table with the following details: Domain, Reason, and Status.
This view will display all processed requests, both approved and denied. -
Investigate
This view allows you to get DNS-related statistics on any domain you input in the search field. The view is split into 3 subsections:
a. Global Threat Intelligence - displays a top 3 of most accessing processes, the DNS-E matches (the number of times, in the selected timeframe, the domain has been intercepted via DNS-E), the Global DNS-E matches (the number of times, in the selected timeframe, the domain has been intercepted by DNS-E in the Global Heimdal Security database), the domains/URLs related to the same IP Address, the DNS-E + DNS-N matches (the number of times, in the selected timeframe, the domain has been intercepted by DNS-E and DNS-N), the Global DNS-E + DNS-N matches (the number of times, in the selected timeframe, the domain has been intercepted by DNS-E and DNS-N in the Global Heimdal Security database).
b. Predictive DNS Score - displays a maliciousness score based on an Artificial Intelligence algorithm (ranging from 0 to 100) that is corroborated with the presence of the domain (in question) on the DNS Security Endpoint blocklist (blocklist match). The higher the score, the higher the probability that the domain in question is infected. The Predictive DNS Score will showcase a Risk Level (None, Low, Medium, High, Critical) based on the above-mentioned score.
c. DNS Statistics - displays a graphical representation of the daily number of hits for the chosen domain (the blue
the line shows that the queried domain was found clean at the time of the query, while the red line shows that the queried domain was found infected at the time of the query.
d. Requester distribution - displays a map and statistics of the top public IP Addresses that called the domain in question (the origin of the DNS query to the domain in question). -
CASB
This view displays a list of the applications discovered by the DarkLayer Guard engine in your environment and the following details: Application Name, Vendor, Installed Endpoints, and Risk Level. CASB can be used as a cloud access security broker (CASB) that provides a comprehensive set of capabilities to help you manage and control the use of cloud apps across your organization - including visibility into inappropriate cloud app usage.
The selection column allows you to select one or multiple applications and add/remove them to/from the Application blocklist.
The Download CSV functionality allows you to generate and download a CSV report that includes all the information corresponding to each view.
Please note that hostnames that are listed in Standard View and Latest Threats View with the N/A tag instead of their name are not listed in the Forward Lookup Zones. In order to fix this, you will need to add those hostnames to the Forward Lookup Zones.
DNS Security PREVENTION - NETWORK settings
To set up DNS Security - Network in the HEIMDAL Dashboard, you have to access the Network Settings section -> DNS Security tab.
DarkLayer Guard - turn on/off the DNS Security - Network module.
Log Agent logging - turn ON/OFF intercepted logs reporting within the HEIMDAL Dashboard,
Hybrid DNS - turn ON/OFF the HEIMDAL DNS Server that runs locally on the DNS Server to filter the DNS queries. This option requires the LogAgent to be installed on the DNS Server.
DNS over HTTPS (DoH) for DNS Security - when enabled, all DNS queries will be resolved via the set DoH server (when the check box is ticked, a text field, where the DoH server domain or IP should be mentioned, will become available), except the queries related to the server itself.
Domains Allowlist/Blocklist - allows you to allowlist/blocklist a domain/sub-domain for the users in your network. You can allowlist or blocklist domains, subdomains, top-level domains ( com, co.uk, etc.), or even multiple domains at once by uploading a CSV file (when saving an Excel workbook/sheet as a CSV file, the domains/subdomains are automatically delimited by a comma [,] and they need to be listed on the same row; you can download a sample CSV file from here):
Internal Approval flow - allows end users to have the option to submit, from either the Heimdal default block page or the custom one, domain allowlisting requests, while IT Admins will receive and manage these requests directly from the Heimdal Dashboard.
When Enabled: End users will see a "Request Unblock" button on the block page. Clicking this button allows them to submit a request (with an optional justification) that is routed to the internal IT team. These requests are centralized in the Heimdal Dashboard under DNS Security -> Allowlist requests for review, where an Administrator can manually approve or deny them.
When Disabled: The block page will instead display a "Website reanalysis request" button. This action submits the domain directly to Heimdal Customer Support for a global intelligence evaluation to determine if the domain should be reclassified.
Require Allowlist Reason – When this sub-option is enabled, end users are required to provide a justification (up to 100 characters) when submitting an unblock request. This mandatory reasoning is then displayed alongside the request in the Heimdal Dashboard, providing administrators with the necessary context for a more efficient review and approval process.
Application blocklist - allows you to add any application intercepted by CASB. This list gets populated when you add an application from the CASB view. The Application blocklist works in conjunction with the Domain Blocklist. Its rules are not applied if the latter is disabled. Domains Allowlist takes precedence over any blocklist. If a domain or application domain is blocked in the Application blocklist and/or Category list, but is also added to the Domains Allowlist, the domain in question will be allowed, and the end user can access it.Block By Category - this feature allows you to block groups of domains that are included in a category (for example: Social, Sports, Gambling, Finance, Health, Keeping Children Safe in Education, and others). Block by Category is NOT supported when using Hybrid DNS.
Custom block pages - this feature allows you to set your organization's name, craft a personalized message to be displayed on the block page, and incorporate your logo, which will replace the default Heimdal block page when DNS Security - Network intercepts and blocks access to a malicious domain (or blocklisted domain). Custom block page is NOT supported when using Hybrid DNS.
Access Rule* - add your Public IP Address(es) to filter traffic through our DNS Servers. Here you can specify a Public IP Address or a Subnet.
FILL CURRENT IP - automatically add your current Public IP Address in the Subnet field, getting it ready for being added as an Access Rule.
- You can add an Access Rule only if you are logged into the HEIMDAL Dashboard from the Public IP Address that you are trying to add as an Access Rule.
- You can only add /32, /31, and /30 subnets.
- If you need a wider range, please raise a ticket with HEIMDAL Support.
- Once a new Access Rule is added for a Public IP Address or Subnet, it will be allowed in our database. Removing it from the Access Rules will stop the filtering through our DNS Servers and could cause connectivity issues on your DNS Server if you are still forwarding traffic through the DNS Security - Network.
*WARNING: Once a new Access Rule is added for a Public IP Address or Subnet, it will be allowed in our database. Removing it from the Access Rules will stop the filtering through our DNS Servers and could cause connectivity issues on your DNS Server if you are still forwarding traffic through the DNS Security - Network.
Log unknown hostnames - logs and displays unknown (N/A) hostnames in the DNS Security Network views (Standard view and Latest Threats view).
Log local domains - logs and displays intercepted local domains.
Policy check interval - sets the check interval of the DNS Security Log Agent.
Update Network Settings - updates all the configurations performed in the DNS Security Network module.
IMPORTANT
To enable the display of the default or custom block page for HTTPS websites when using DNS Security - Network, you will have to download and install the certificate manually on all devices. Go to the Guide -> Download and Install tab in the Heimdal dashboard.