- Remote Access Protection.
- Ransomware Encryption Protection X
- Preboot Execution Environment (PXE)/ Network Windows OS deployment.
- Heimdal Agent co-branding.
- Application Control – backend refactoring and UI enhancements.
- PSA Integrations (Autotask & ConnectWise PSA) Hostname matching enhancement
A new version of the Heimdal Production (PROD) dashboard, 5.0.5, is now live.
Starting Friday, October 17th 2025, the Heimdal Production Agent will be available for download in the dashboard's "Guide" section under the "Download and Install" tab. It will be deployed on a roll-out basis over the course of the coming weeks.
Heimdal Dashboard
Preboot Execution Environment (PXE)/ Network Windows OS deployment
After the launch of our iPXE/ Network OS deployment module in the 3.9.0 release (fall of 2024), we have been constantly looking to streamline and bypass the Microsoft-imposed limitations related to deploying operating systems within the network.
With the 5.0.5 PROD release we can strongly state that we just did that and that installing OS on the hardware of your IT estate became effortless and scalable.
Similarly to the previous version of the Heimdal Network Windows OS deployment module, the new, revamped one offers a multitude of versatile functionalities:
- Repository Management: manage your OS image repository through Network Settings;
- Image Management: upload and manage operating system images;
- PXE Server Promotion: promote a hostname to function as a PXE server;
- Inheritance Feature: inherit the reseller repository settings;
while bypassing previously well-known limitations such as deploying Windows 11.
Setting up and Endpoint as a deployment Server:
- Install the Heimdal Agent: download the Heimdal Agent from the Dashboard, install it using a valid license key;
2. Activating the Network OS Deployment Feature: navigate to Network Settings > Network OS Deployment and tick the checkbox with the same name.
The option to "Inherit Reseller Repository” can only be activated by a Reseller user account, for the currently impersonated Corp. Customer. For the Corp. Customer this option is grayed out. When enabled, the Corp. Customer has access to all the ISO files uploaded by the Reseller, together with the ones uploaded by himself.
3. Upload OS Images: in order for the Network OS Deployment Feature to work properly, it is necessary to upload valid ISO files. Press the "Upload OS Image" button, a modal window is displayed which allows selecting an ISO file and adding a description.
Once the upload button is pressed, the file starts uploading to the cloud. It's important to keep the window open until the upload is finished, otherwise the upload will be stopped.
Note: if the image(s) upload takes more than 2 hours, the user will be logged out due to inactivity.
4. Create the PXE Server: navigate to Unified Endpoint Management > Device Info, Standard view; select a host you want to designate as PXE deployment server and from the “Select what action to take” drop-down list choose “Add OS Deployment Server”.
5. Configure the PXE Server: there are several settings that can be put in place/ amended when adding a new server or editing an existing one:
- Check time interval - this setting considers a specific time interval measured in minutes, based on whose value the system will periodically check the PXE version and automatically download a new version from Microsoft Entra ID, if available.
- Enforce User Authentication - the end user will be obliged to use the pre-set (at GP level) credentials, in order to be able to access the PXE server OS repository.
- Download Path - sets the default location for downloading ISO files. Make sure that the selected drive has enough free space to accommodate the number of ISO files set to be downloaded.
- Available OS images - pressing the "Add OS Image" button, enabled the user to select from the currently available ISO images. All available ISO images are displayed in the dedicated list.
After the Sync GP operation is successfully completed, on the endpoint, 2 services will become active: Heimdal OsDeployment and Heimdal OsDeployment Checker.
6. Client Endpoint Connection to the Server:
- Set the Correct Boot Order: on the client endpoint set the boot priority, from BIOS, to Network first.
- Initiate Connection: make sure that the PXE Server is turned on and visible within the network. Start the client endpoint.
- Authentication: on the Client side, enter the username and password if required.
- Load Windows Preinstallation Environment (PE): the system will load Windows PE.
- Select OS Image: choose the designated OS image for installation.
- Start Windows Setup: proceed with the regular Windows setup.
Heimdal Agent
Heimdal Agent co-branding
The current co-branding functionalities (dashboard & reports) have been extended to the Heimdal Agent too, enabling MSPs and Corp. Customers to display the set logo in the agent UI.
For both resellers and corp. customers, there are 2 upload options available (Guide -> Customer Settings -> Company Info):
-
Large logo - used in:
- Heimdal Dashboard (Login page, Reports, Alerts).
- Heimdal Agent co-branding scenario, when the agent menu is expanded.
-
Small logo - used in the Heimdal Agent co-branding scenario, when the agent menu is collapsed.
Similarly to the Heimdal Dashboard and Reports, the “Reseller Logo Distribution” feature (reseller level) combined with the Corp. Customer level “Opt out Reseller Logo” feature, provide the same flow in the Heimdal Agent too.
Heimdal Privileges & App. Control
Application Control – backend refactoring and UI enhancements
Streamlining performance and user experience are two of our utmost priorities. In this respect our new product version brings along a completely refactored App. Control module, making the product faster, more secure, stable and generating better user experience.
Besides the complete backend restructuring, the dashboard App. Control product space underwent some changes, making navigation and data visualization more efficient and relevant.
The previous: Matching Allowed rules, Matching Blocked rules, Matching Allowed with auto elevation and Full logging views have been decommissioned and now the Application Control dashboard section (Products -> Privileges & App Control) is more robust as is comprised of only two views: Standard and Raw data, while data sorting and filtering remains the same as before and allows IT admins to visualize relevant data as desired.
The new Raw Data view displays a grid with all the processes (unstacked) intercepted by App Control during the last 24 hours of the selected timeframe, with the following details: Process Name, Number of Executions, Publisher, Software Name, Version, MD5, Status, Deny file permissions, Elevated, and Timestamp.
The view includes similar filtering options as the ones from the Standard view.
Should you require historical data (up to a maximum of previous 30 days, from the “To” date), this can be provisioned “on demand” and you will need to reach out to our Support department.
Last but not least, part of the Application Control UI enhancements scope, is the addition of the “Select GP” drop-down list in both the Standard and Raw data product views, which will facilitate data visualization in the context of high information volumes, allowing IT admins to select one or multiple GPs and filter data accordingly.
Heimdal Endpoint Detection
Firewall: Remote Access Protection
As a natural evolution of the freshly launched 4.9.0 Firewall Brute Force Attacks enhancements, we are proud to give you the “end of all breaches”: Remote Access Protection (RAP).
Considering the root cause of most of the security breaches, a simple, yet hard to tackle one – security vulnerabilities derived from the management of RDP ports, the Remote Access Protection (RAP) is a vital, must-have element of your security stack.
RAP represents a new security layer which allows you to monitor and control the RDP access.
This feature is designed to monitor, block and manage RDP connection attempts made to Heimdal-protected endpoints, helping prevent unauthorized remote access while allowing granular control via allowlisting and group policy settings.
RAP complements existing Heimdal security submodules such as Firewall and Brute Force Attack Protection, forming a complete endpoint defense strategy and it is neatly tied with our User Security module, M365, substantiating unification, one of our product stack distinctive and defining trait.
The Remote Access Protection (RAP) submodule provides full visibility and control over RDP connection attempts to devices protected by the Heimdal Agent.
When enabled via Group Policy (Endpoint Settings -> click on a Windows GP -> Endpoint Detection -> Firewall & RAP -> RAP tab):
- all inbound RDP traffic is monitored.
- connections are blocked by default, unless the source IP is allowlisted or belongs to a private IP range permitted through the "Do not block private IPs" setting from the GP.
Each RDP attempt is logged in the Dashboard, allowing administrators to:
- review the connection source and target.
- allowlist trusted Ips.
- set expiration dates for the allowlist entries.
- acknowledge connection attempts (marking them as Blocked).
The former Firewall tab (Endpoint Settings -> Endpoint Detection) has been renamed to Firewall & RAP, and now includes three distinct sub-tabs:
- Firewall – all existing firewall - related settings.
- RAP – configuration pertaining to the new Remote Access Protection module.
- Brute Force Attack Protection – existing BFA Protection settings, now moved under this new structure.
The new Remote Access Protection (RAP) module has been introduced as part of the Firewall & RAP configuration. This module is designed to monitor incoming Remote Desktop Protocol (RDP) traffic and prevent unauthorized access by default-blocking any connection not explicitly allowlisted.
Note: Remote Access Protection can be enabled only if the Firewall module is also active.
Available Configuration options:
- Remote Access Protection – this toggle activates RAP.
- RAP-monitored ports – specifies one or more ports for monitoring, when it comes to incoming RDP connections:
- multiple values will be separated by comma “,” (e.g., 3389,3390).
- when edited, in either the Brute Force Attack Protection or RAP sections, the value is automatically synchronized to ensure consistency across both modules.
- Do not block private IPs – allows all incoming RDP connections from private Ips.
- Allowlist:
- authorizes IT administrators to manually specify IPv4 addresses or IPv4 ranges that are permitted to connect via RDP.
- entries can also be added via the Import functionality, enabling bulk management of trusted IPs or ranges.
- IP ranges can be added using the hyphen (-) notation (e.g., 192.168.0.1-192.168.0.255)
- each allowlist entry can have an optional expiration date:
- if no expiration date is set, the entry remains valid until manually removed.
- if an expiration date is configured, the entry remains valid until it expires, but remains visible in the dedicated product grid, post-expiration, for traceability purposes.
- when setting or editing an expiration date, the system enforces that the selected date is subsequent to the current date, ensuring that expired or same-day entries cannot be configured.
- allowlist entries can be edited or deleted as needed.
- Automatically acknowledge greylist detection blocking after 7-30 days – entries with the status Default blocked, not actioned will be automatically updated to Blocked after the configured number of days has passed since the recorded Timestamp, unless manually acknowledged earlier.
- M365 integration:
- this configuration section is always visible in the Group Policy but remains disabled unless TAC UI & M365 User Security is licensed.
- when licensed and enabled, administrators gain access to risk-based intel that can be leveraged for allowlisting, including:
- the ability to define an allowlist risk score threshold via a slider.
- an extra confirmation dialogue, for the cases when an end user’s risk score exceeds the aforementioned threshold, is displayed before the action is completed.
- when licensed and enabled, administrators gain access to risk-based intel that can be leveraged for allowlisting, including:
- this configuration section is always visible in the Group Policy but remains disabled unless TAC UI & M365 User Security is licensed.
Note: the "Enable M365 User Security Integration" GP feature does not affect previously reported data. It only influences how data will be evaluated and reported for future RDP connection attempts, starting from the moment the setting is enabled.
The product view, from the Heimdal dashboard (Products → Endpoint Detection → Firewall → Remote Access Protection)
and the client specifics view (post clicking a hostname from the Remote Access Protection view grid)
display all detected RDP connection attempts with their associated status:
- Default blocked, not actioned – detected & blocked RDP connections that are not acknowledged by the Dashboard user.
- Blocked – detected & blocked RDP connections that were acknowledged by the Dashboard user.
- Allowlisted – detected & blocked RDP connections that were later allowlisted by the Dashboard user.
The other columns available in the two earlier-mentioned views are:
- Hostname – name of the targeted machine.
- Last Known Username – most recent user logged into the machine.
- IP – source IP attempting the RDP connection.
- Expected User – retrieved by checking Login Anomaly Detection (LAD) based on the source IP and identifying the last connected user from that IP.
- if a match is found, the expected username is displayed.
- if no match is found or Login Anomaly Detection (LAD) is not licensed or configured, the field will show N/A.
- MFA Enabled – displays an Enabled or Disabled status icon, based on the current MFA configuration of the user identified in the Expected User column.
- available only if M365 User Security and Login Anomaly Detection (LAD) settings are active.
- if M365 User Security is not licensed or enabled, the field displays N/A.
- Strong Password enabled – displays an Enabled or Disabled status icon, based on the current strong password configuration of the user identified in the Expected User column.
- available only if M365 User Security and Login Anomaly Detection (LAD) settings are active.
- if M365 User Security is not licensed or enabled, the field displays N/A.
- State – reflects the status of each recorded RDP connection:
- Default blocked, not actioned (default state) – The connection was automatically blocked by the RAP module and has not yet been reviewed by an administrator.
- Blocked – Manually acknowledged by an administrator or auto-updated after 7–30 days if the Greylist auto-acknowledge Group Policy option is enabled.
- Allowlisted – The connection was permitted based on the corresponding Group Policy Allowlist entry, as long as the entry has not expired.
- Risk Score – displays the risk score of the user identified in the Expected User column:
- if M365 User Security is not licensed or enabled, the value displayed is 0.
- Timestamp – when the connection attempt occurred.
When it comes to actionability on the RAP entries, the following actions (Select what action to take drop-down list) can be taken, post selecting one or multiple entries from the RAP product/ client specifics views, depending on the state:
- for Default blocked, not actioned entries:
- Acknowledge – changes the state to Blocked.
- Add to Allowlist:
- when adding an IP to the allowlist, the modal allows for single or multi-GP selection.
- expiration date can be configured.
- If the M365 validation is enabled and the risk score exceeds the threshold, an additional confirmation dialog is shown.
- for Blocked entries:
- Add to Allowlist:
- when adding an IP to the allowlist, the modal allows for single or multi-GP selection.
- expiration date can be configured.
- If the M365 validation is enabled and the risk score exceeds the threshold, an additional confirmation dialog is shown.
- Add to Allowlist:
- for Allowlisted entries:
- Remove from Allowlist:
- available only when the allowlist entry is an exact match with the listed IP address.
- when removing an IP from the allowlist, the modal allows for single or multi-GP selection.
- removal is not supported for IPs that are part of a defined IP range, in the Group Policy Allowlist.
- Remove from Allowlist:
As previously mentioned, the Allowlist action can be made on Single GP selection, and the following validation modal window will be displayed
or on Multiple GP selection, scenario depicted in the below modal window
Ransomware Encryption Protection X : improved protection and performance
A new Ransomware Encryption Protection X engine is now available in our REP Endpoint submodule. The Ransomware Encryption Protection X Kernel mini-filter driver can be enabled/ disabled (default enabled for newly created Group Policies) from the Endpoint Settings -> click a Windows GP -> Endpoint Detection -> Ransomware Encryption Protection, Ransomware Encryption Protection X section of the GP.
Note: the REP X settings work the same as REP v1 (General settings and Exclusions).
REP X can be seen as a separate service in Windows Services (“HeimdalREPService”).
A sanity check is performed every 2 minutes to verify if the REP service is still running and to restart it in case it stops.
The enhanced detection and speed of the REP X engine comes from the versatility and power of the new Kernel mini-filter driver which can identify and stop more than 800 ransomware categories, as it incapsulates 4 sub engines:
Encryption Engine:
- enables real-time file encryption monitoring to detect unauthorized encryption attempts.
- it is enabled by default when a new GP is created.
Rename Engine:
- detects suspicious file rename activity, frequently used by ransomware during encryption attacks.
- it is enabled by default when a new GP is created.
Volume Shadow Copy Engine:
- monitors and protects Volume Shadow Copies from deletion to preserve restore points.
- it is enabled by default when a new GP is created.
Canary Engine:
- activates the creation and monitoring of decoy files to detect unauthorized access.
- it is enabled by default when a new GP is created.
- four extra Canary Engine – related settings are available:
- Canary visibility - controls the visibility of canary files: hidden, visible or system hidden.
- Canary folders - specifies the location in which canary files will be placed. These should include sensitive or high-risk directories.
- Canary file types - selects file types used for canary traps. “All” includes common document and media formats. Formats are randomly selected when generating canary files.
- Canary suffix - adds a unique suffix to all canary files for easy identification and filtering.
Note: a user cannot delete a canary file (in case attempts to delete one are made, a pop-up message will be displayed in the Heimdal Agent).
Regardless of the sub engine that triggers the detection and blocking process, the end user will receive the following pop-up message from the Heimdal agent.
Heimdal Email Protection
Email Security - Quarantine Report enhanced threat categorization: Botnet support
This new enhancement improves visibility and threat categorization in Email Security’s Quarantine Report by introducing support for the Botnet threat type.
The Botnet category is now automatically included under the Spam selection in the Quarantine Report. This ensures that emails flagged as Botnet are correctly surfaced and handled by existing quarantine mechanisms, without requiring manual configuration. This update improves threat coverage and ensures consistent handling of all malware-related items, including Botnet traffic.
In Network Settings -> Edit/ Add domain -> Quarantine Settings, Advanced Threat Protection section, near to the Spam category, an info bubble has been added mentioning that this category specifically treats Spam and Botnets.
And, in case this will be enabled to be included in the Quarantine Report (Include in Report) this type of category threats will be specifically singled out in case of detection.
Other improvements & fixes:
1. Admin check box (in licensing options) for NFR agreements
To improve administrative control and reporting accuracy (NFR license customer won’t be included in the Device and Monthly Billing Info Heimdal Admin Reports), a new option “NFR” (Not for Resale) has been introduced at Corp. customers level and can be altered (enabled/ disabled) only by dashboard users who have reseller roles.
This option comes in the shape of a checkbox and can be found in the Create Customer/ Update Customer pages from the Admin section of the Heimdal Dashboard.
Note: reseller users can enable the NFR option on only one Corp. Customer;
For streamlined navigation, in the Admin -> Customers/ Partners page a new filter for NFR Customers has been added to the top section of it (if enabled, we will display only the NFR Corp. Customers singling them out visually with a dedicated icon).
2. Addition of “Items per page” drop-down list in the Accounts section
Small, yet powerful user experience enhancement, it consists of the addition, in the Accounts section of the Heimdal Dashboard (post clicking an account/ email), of a new customization option (in the shape of a drop-down list) allowing the selection of the default number of results per page (10/50/100) that will be displayed in the Heimdal Dashboard product pages.
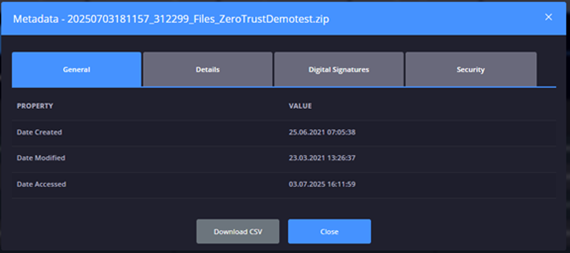
● Forensic enhancement – keep “Upload to storage” files attributes & .csv export
This feature allows users to view and export structured metadata for any file that has triggered detection and has been uploaded to storage (Unified Endpoint Management -> Standard & Hardware views -> click on Hostname -> Logs -> Files tab). The metadata is grouped and displayed in a modal with 4 structured tabs:
- General.
- Details.
- Digital Signatures.
- Security.
An addition "Download CSV" button is added to the modal window, allowing Dashboard users to export all tab contents, into a single CSV file.
3. PSA Integrations (Autotask & ConnectWise PSA) Hostname matching enhancement
This enhancement is related to the addition of a Hostname parameter, to the Support ticket creation flow, in both AutoTask & ConnectWise PSA Heimdal integrations, meant to streamline matching.
ConnectWise PSA
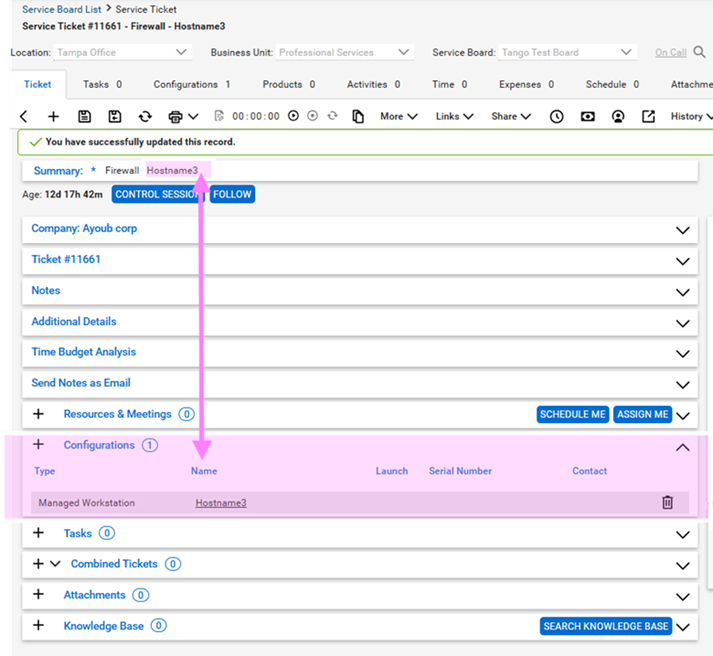
Autotask